Looking to expand your knowledge on fences? Look no further than “http://fencedude.com”, a comprehensive blog dedicated to providing valuable information about fences. With a wide range of posts covering different types, sizes, shapes, and materials, this blog aims to educate readers on the characteristics, advantages, and considerations of various fence options. From exploring the durability and aesthetic appeal of wooden, chain-link, vinyl, and metal fences, to discussing how to choose the appropriate size and shape of a fence based on specific requirements, this blog offers practical guidance to make informed decisions. Stay tuned for a list of 200 relevant topics that encompass the diversity of fence types and their suitability for various purposes. In the meantime, don’t forget to check out the most frequently asked questions about fences at the end of each post, where you’ll find answers to common queries and concerns.
115. How to Properly Anchor Your Fence Posts
When it comes to building a fence, properly anchoring fence posts is crucial for ensuring stability, durability, and longevity. Without proper anchoring, your fence may sag, shift, or even topple over, compromising its functionality and aesthetics. In this article, we will guide you through the step-by-step process of properly anchoring your fence posts, from selecting the right tools and materials to aligning and leveling the posts. By following these guidelines, you can have a sturdy and reliable fence that will stand the test of time.
1. The Importance of Properly Anchoring Fence Posts
Properly anchoring fence posts is of utmost importance for several reasons:
1.1 Ensuring Stability and Durability
Anchoring your fence posts securely will prevent them from shifting or leaning over time. This stability ensures that your fence remains sturdy, with no wobbling or swaying, even during heavy winds or storms.
1.2 Preventing Shifting and Sagging
Without proper anchoring, fence posts may gradually shift, resulting in uneven fence panels or gaps. This can compromise the security and privacy provided by the fence, as well as its overall appearance.
1.3 Enhancing the Overall Strength of the Fence
A properly anchored fence will distribute the forces exerted on it evenly across all posts, enhancing its overall strength. This is particularly important for fences that are subjected to external pressure, such as those in areas with strong winds or where children or pets frequently lean against or climb on the fence.
1.4 Increasing the Lifespan of the Fence
By properly anchoring your fence posts, you can significantly increase the lifespan of your fence. With solid anchoring, your fence will be able to withstand the test of time, avoiding premature decay or damage that could lead to costly repairs or replacements.
2. Tools and Materials Needed for Anchoring Fence Posts
Before you start anchoring your fence posts, gather the following tools and materials:
2.1 Post Hole Digger or Auger
To dig the post holes, you will need a post hole digger or auger. These tools make the process much easier and more efficient compared to manual excavation.
2.2 Measuring Tape and Level
Accurate measurement and proper alignment are key to a well-anchored fence. Use a measuring tape and level to ensure that your posts are correctly placed and that the height and alignment are consistent throughout.
2.3 Concrete Mix and Mixing Tools
Concrete mix is essential for creating a strong foundation for your fence posts. Depending on the size of your project, opt for ready-mix bags or mix your own concrete. Make sure you have the necessary mixing tools, such as a wheelbarrow and a shovel, to prepare the concrete.
2.4 Post Anchors or Brackets
Post anchors or brackets are used to securely attach the fence posts to the ground. These come in various types and sizes, so choose the ones that are suitable for your project and provide the desired level of support.
2.5 Gravel or Crushed Stone
Gravel or crushed stone is used to backfill the post holes and provide additional stability and drainage. It helps prevent soil from shifting and settling, especially in areas with poor soil conditions.
2.6 Reinforcement Materials (Rebar, Post Caps, etc.)
Depending on the type of fence and its specific requirements, you may need reinforcement materials such as rebar or metal rods to increase the stability of the fence posts. Post caps can also be used to protect the tops of the posts from water infiltration and rotting.
2.7 Safety Equipment (Gloves, Goggles, etc.)
To ensure your safety while working on your fence, don’t forget to wear appropriate safety equipment. This includes gloves to protect your hands, goggles to shield your eyes from debris, and sturdy footwear to prevent any injuries while digging or handling heavy materials.

3. Choosing the Right Type of Post Anchoring Method
There are several post anchoring methods to consider, each with its own advantages and suitability for different fence types and soil conditions. Here are the most common methods:
3.1 Concrete Footings
Concrete footings are widely used for anchoring fence posts. This method involves digging deep holes, pouring concrete into them, and setting the posts directly into the wet concrete. Concrete footings provide excellent stability and are suitable for most fence types.
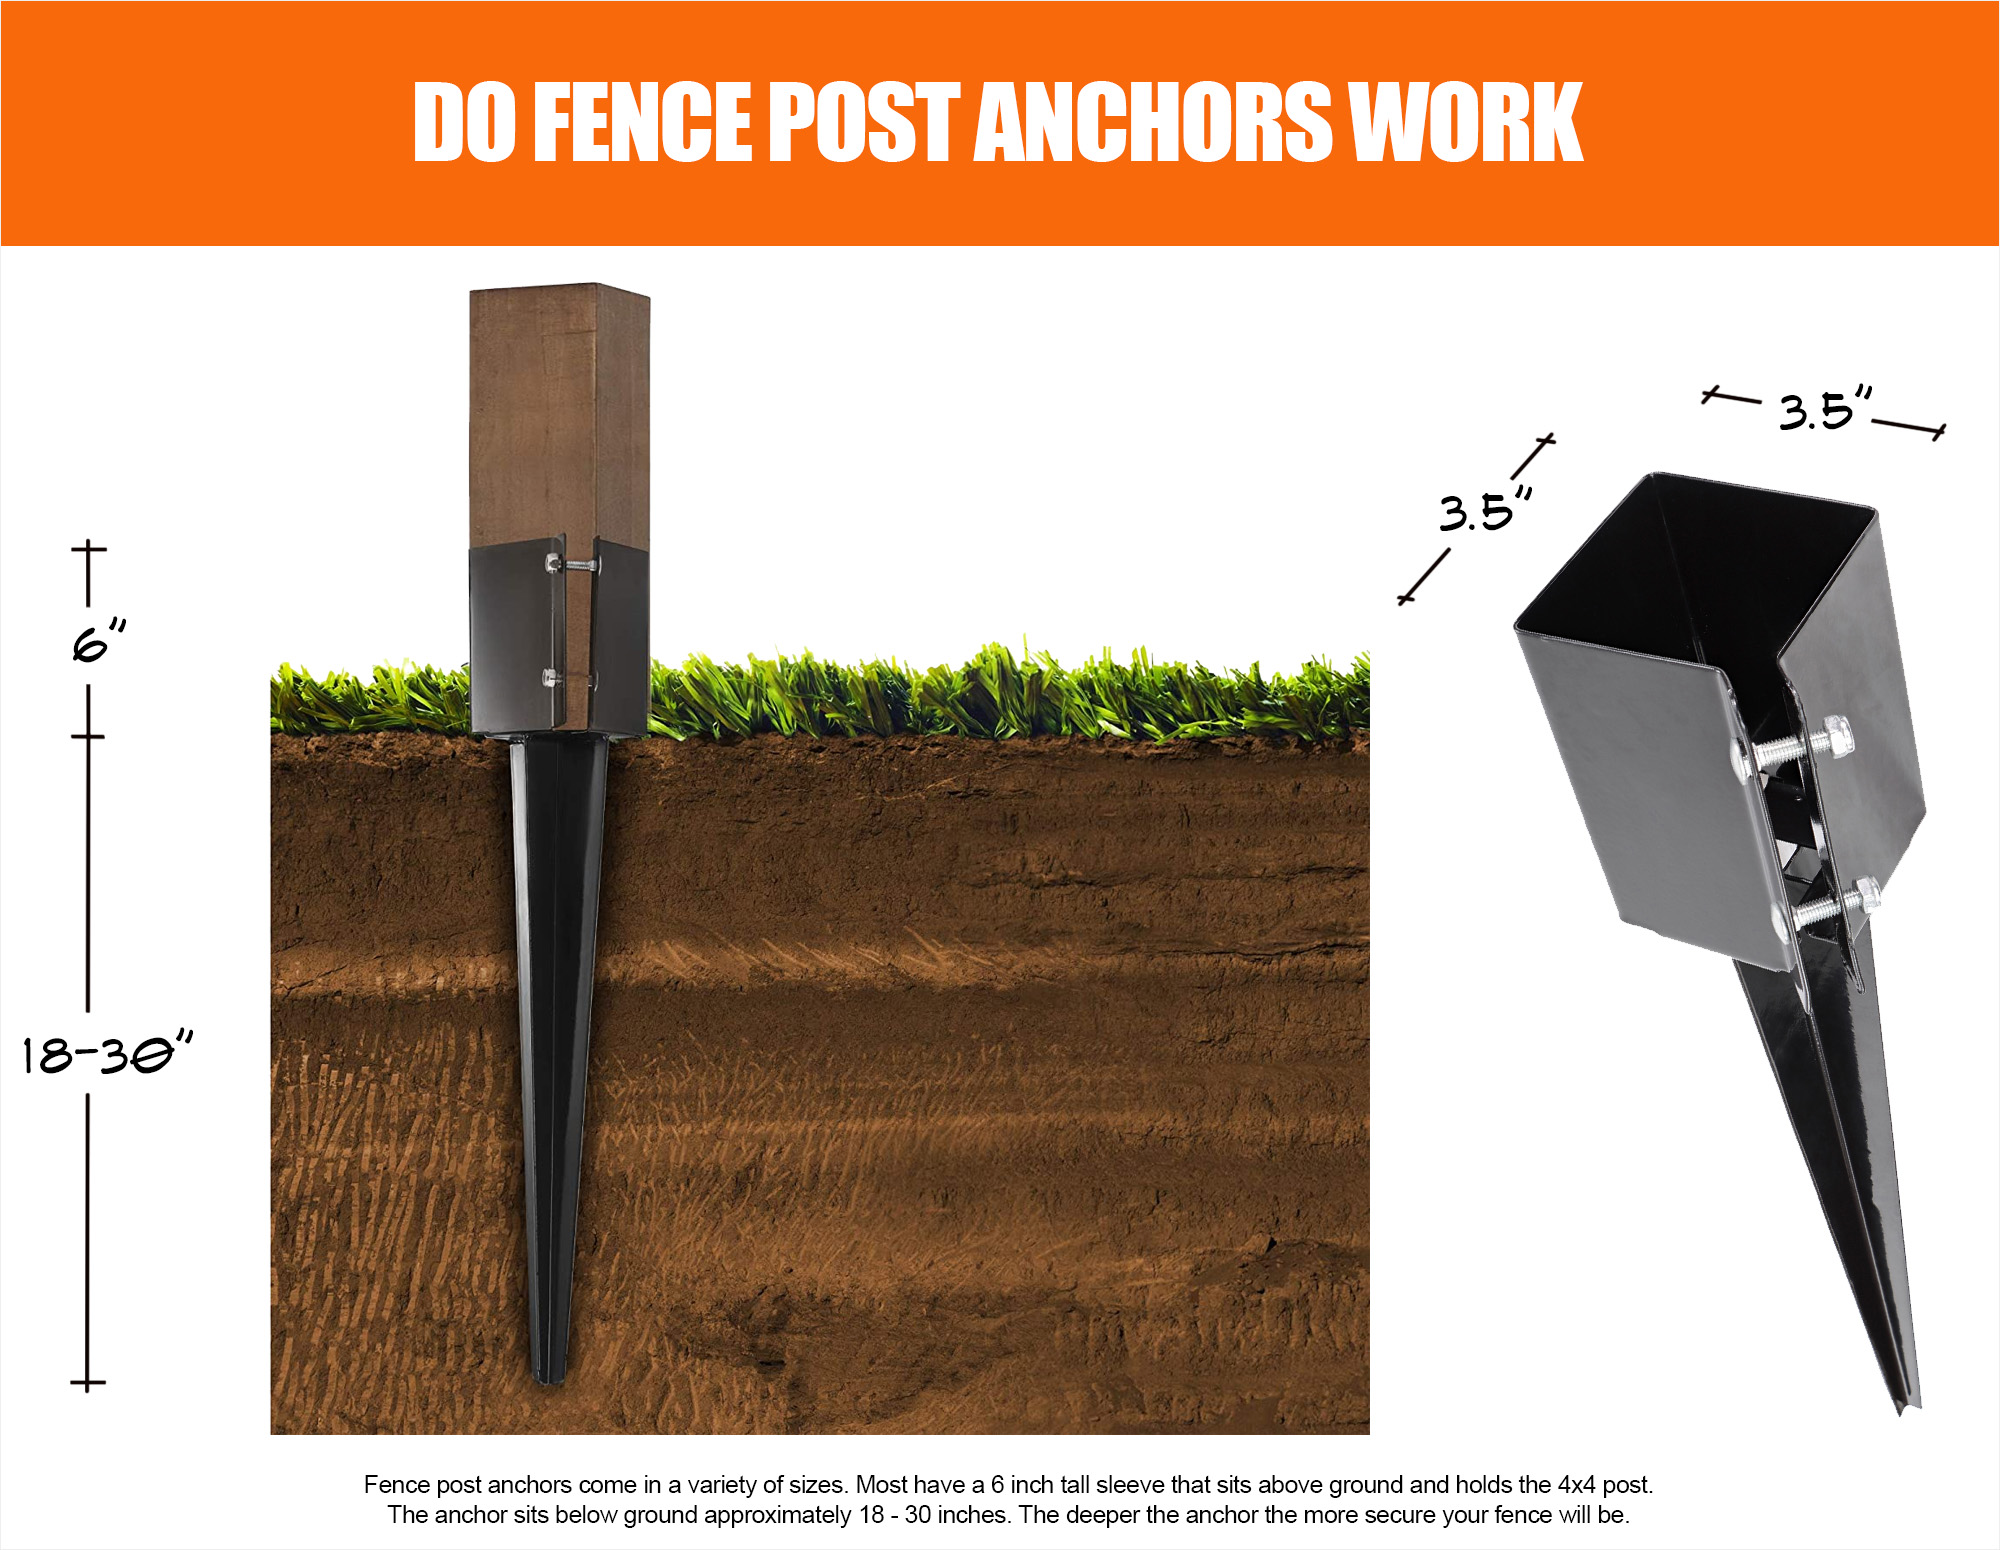
3.2 Post Anchors and Brackets
Post anchors and brackets are alternatives to concrete footings, especially when you want to avoid digging large and deep post holes. These anchor systems are driven into the ground or attached to concrete pads or existing surfaces.
3.3 Gravel or Crushed Stone
In some cases, using gravel or crushed stone alone may be sufficient for anchoring your fence posts, especially if the soil conditions are favorable. This method provides good drainage and stability, but it may not be suitable for areas with high wind loads or heavier fence panels.
4. Setting the Depth and Spacing for Fence Posts
Properly setting the depth and spacing for your fence posts is essential for the overall strength and stability of your fence. Consider the following factors:
4.1 Determining the Ideal Depth
The depth to which you should sink your fence posts depends on various factors, including the frost line in your region, the type of soil, and the height and weight of your fence. As a general rule, aim for a depth of at least one-third of the total above-ground height of the fence post.
4.2 Calculating the Spacing Between Posts
To ensure the structural integrity of your fence, you must calculate the correct spacing between posts. This depends on the fence type, the size and weight of the panels, and the expected loads. Refer to fence-building codes or guidelines in your area for recommended spacing.
4.3 Considering Soil Conditions and Frost Line
Soil conditions play a significant role in determining the integrity of your fence posts. If you have clay or sandy soil, for example, you may need to take additional precautions to ensure stability. Additionally, be aware of the frost line in your area, as it can impact the depth to which your posts need to be set.

5. Digging the Post Holes
To properly anchor your fence posts, you need to dig the post holes correctly. Here’s how to do it:
5.1 Marking the Post Hole Locations
Using stakes and string or marking paint, mark the locations where the fence posts will be installed. Ensure the spacing between each post is consistent, based on your previous calculations.
5.2 Using a Post Hole Digger or Auger
With your marked locations, use a post hole digger or auger to excavate the holes. Start by removing the top layer of grass or vegetation, then dig deep enough to reach the desired depth. Make sure the holes are wide enough to accommodate the size of the post and any additional gravel or concrete.
5.3 Removing Debris and Ensuring Proper Hole Size
Once you have dug the post holes, remove any debris or rocks that may hinder the placement of the posts. Check the depth and diameter of the holes to ensure they match your desired specifications.
6. Installing Concrete Footings
If you have opted for concrete footings as your post anchoring method, follow these steps to ensure their proper installation:
6.1 Digging and Preparing the Footing Holes
For each post hole, dig a wider hole at the base to accommodate the concrete footing. The width should be approximately twice the diameter of the fence post. Make sure the bottom of the footing hole is leveled and compacted.
6.2 Mixing and Pouring the Concrete
Follow the instructions on the concrete mix packaging to properly mix the concrete. Once mixed, pour the concrete into the footing holes, ensuring it reaches the desired depth. Use a shovel to consolidate the concrete and remove any air pockets.
6.3 Embedding the Post in Wet Concrete
Immediately after pouring the concrete, carefully insert the fence post into the wet concrete foundation. Ensure the post is aligned correctly and plumbed with a level before the concrete sets. Allow the concrete to cure according to the manufacturer’s instructions before continuing with the rest of the fence installation.

7. Using Post Anchors and Brackets
If you have chosen to use post anchors or brackets instead of concrete footings, here’s how to securely attach your fence posts:
7.1 Attaching Post Anchors to the Ground
Determine the appropriate location for the post anchors, following the spacing and alignment guidelines. Depending on the type of post anchor, you may need to drive it into the ground using a sledgehammer or secure it to an existing concrete pad with screws or bolts.
7.2 Mounting Fence Posts on Anchors or Brackets
Once the post anchors are securely in place, attach the fence posts to the anchors according to the manufacturer’s instructions. This usually involves inserting the post into the anchor system and tightening it with screws, bolts, or other fasteners.
7.3 Securing Posts with Nails, Screws, or Bolts
To provide additional stability, you may need to secure the fence posts to the post anchors or brackets using nails, screws, or bolts. Ensure that the fasteners are suitable for outdoor use and can withstand the weight and external forces exerted on the fence.
8. Securing Posts with Gravel and Tamping
Gravel can be used to provide additional stability and drainage for your fence posts. Here’s how to secure your posts using this method:
8.1 Pouring Gravel into Post Holes
After installing your fence posts, pour gravel or crushed stone into the post holes. The gravel should fill the holes up to a few inches below ground level. Ensure that the gravel is evenly distributed around the posts, providing a solid base for the fence.
8.2 Tamping the Gravel for Stability
Using a tamper or the back of a shovel, compact the gravel layer around the fence posts. This will increase stability and eliminate any air pockets that may cause the posts to shift over time. Repeat tamping until the gravel is firmly packed.
8.3 Adding Layers of Gravel for Additional Support
For added stability, you can add additional layers of gravel or crushed stone above the initial layer as necessary. This is particularly beneficial for fences with heavier or taller panels or in areas with challenging soil conditions. Repeat the pouring and tamping process until you reach ground level.

9. Adding Reinforcement for Extra Stability
Depending on your specific fence needs, you may want to consider adding reinforcement to increase the stability of your fence posts. Here are some common reinforcement methods:
9.1 Using Rebar or Metal Rods
Rebar or metal rods can be inserted into the post holes before pouring the concrete or gravel. This additional reinforcement provides extra rigidity and prevents the posts from shifting or leaning. Insert the rods vertically into the holes and ensure they extend into the concrete or gravel by a few inches.
9.2 Installing Post Caps for Protection
Post caps are not only decorative but also protect the tops of the fence posts from water infiltration, which can lead to rotting or decay. Choose caps that are suitable for your fence type and install them securely on top of each post to extend their lifespan.
9.3 Applying Concrete Mix Around Posts
For added stability and durability, you can apply a thin layer of concrete mix around the base of each fence post after it has been set. This provides extra support and helps protect the posts from moisture and soil contact. Simply mix the concrete and apply it around the base of the post, ensuring a smooth and even finish.
10. Properly Aligning and Leveling Fence Posts
Proper alignment and leveling of your fence posts are crucial for a professional-looking and structurally sound fence. Follow these steps to ensure accurate positioning:
10.1 Checking Alignment with String or Level
To ensure proper alignment, attach a string or a level line between the corner or end posts. Use this line as a guide to align the other posts by checking their positions against it. Adjust the posts until they are perfectly aligned along the entire length of the fence.
10.2 Adjusting Post Positions as Needed
If any of the posts are not in perfect alignment or if you notice any shifting, adjust their positions accordingly. This may involve loosening the anchors, repositioning the posts, and then tightening the anchors once again.
10.3 Ensuring Uniform Height and Levelness
Use a level to ensure that all the fence posts are at the same height and perfectly level. Adjust the depth of the post holes or the height of the fence posts as needed until they are uniformly level and at the desired height.

11. Tips for Finishing and Maintaining Anchored Fence Posts
To complete your fence project and ensure its long-term functionality and aesthetics, consider the following tips:
11.1 Allowing Sufficient Drying Time for Concrete
If you have used concrete as a post anchoring method, allow sufficient time for the concrete to cure before subjecting the fence to any stress or strain. Follow the manufacturer’s instructions for curing time, usually around 24-48 hours, before continuing with any further fence installation.
11.2 Applying Sealant or Paint for Protection
To protect your fence from the elements and increase its lifespan, consider applying a sealant, stain, or paint. These protective coatings can help prevent water infiltration, rotting, UV damage, and other forms of weathering. Choose coatings that are specifically formulated for outdoor use and compatible with the material of your fence.
11.3 Regularly Inspecting and Repairing Posts
Periodically inspect your fence posts for any signs of damage or wear. Address any issues promptly, such as loose posts, cracks, or signs of rotting. Regular maintenance and repairs will help prolong the life of your fence and prevent small issues from turning into larger problems.
11.4 Properly Cleaning and Maintaining the Fence
To keep your fence looking its best, regularly clean it to remove dirt, debris, mold, or mildew. Depending on the material, you may need to use specific cleaning solutions or techniques. Follow the manufacturer’s instructions or consult a professional for the proper cleaning and maintenance methods for your particular fence type.
Now that you have a comprehensive understanding of how to properly anchor your fence posts, you can confidently embark on your fence installation project. By following these guidelines and investing the necessary time and effort, you will have a sturdy and long-lasting fence that will enhance the aesthetics and functionality of your property.
Common Questions and Answers:
-
Q: Can I use concrete mix to anchor fence posts without digging deep holes? A: Yes, using concrete mix is a common method for anchoring fence posts. However, it is essential to dig deep enough holes to ensure the stability and strength of the fence.
-
Q: Can I use post anchors on existing concrete surfaces? A: Yes, post anchors can be attached to existing concrete surfaces using screws or bolts. Ensure that the anchors are securely fastened for maximum stability.
-
Q: How deep should I dig the post holes for a typical residential fence? A: The depth of the post holes will depend on various factors such as the height of the fence, soil conditions, and regional frost line. As a general guideline, aim for a depth of at least one-third of the above-ground height of the fence post.
-
Q: Do I need to add reinforcement to my fence posts? A: Reinforcement, such as rebar or metal rods, can provide extra stability for your fence posts. Consider adding reinforcement for areas with high wind loads or heavier fence panels.
-
Q: How do I ensure that all my fence posts are at the same height and level? A: Use a level to check the height and levelness of each fence post. Adjust the depth of the post holes or the height of the fence posts as needed until they are uniformly level and at the desired height.
-
Q: Is it necessary to apply a protective coating to my fence posts? A: While not necessary, applying a sealant, stain, or paint to your fence posts can help protect them from environmental factors, increase their lifespan, and enhance their appearance.
-
Q: How often should I inspect and maintain my fence posts? A: It is recommended to inspect your fence posts periodically for any signs of damage or wear. Regular maintenance and prompt repairs will help prolong the life of your fence and prevent any issues from escalating.
-
Q: What is the difference between concrete footings and post anchors? A: Concrete footings involve pouring concrete into dug holes to anchor the fence posts directly, while post anchors are driven into the ground or attached to existing surfaces to provide support for the fence posts.
-
Q: Do I need to use gravel or crushed stone with concrete footings? A: Using gravel or crushed stone in the post holes along with concrete helps improve drainage and stability, especially in areas with poor soil conditions.
-
Q: Can I install a fence without anchoring the posts? A: Properly anchoring fence posts is essential for the stability and durability of the fence. Installing a fence without anchoring the posts may result in shifting, sagging, or even the fence falling over.